HandbuchTodo: Unterschied zwischen den Versionen
Ingo (Diskussion | Beiträge) (→Master) |
Ingo (Diskussion | Beiträge) (→Master) |
||
| Zeile 110: | Zeile 110: | ||
== Master == | == Master == | ||
| + | [[Datei:PC DIMMER Master EN.png|right]] | ||
=== English === | === English === | ||
| − | The master window includes four sliders. The Dimmer master | + | The master window includes four sliders. The Dimmer master controls all dimmer and RGB channels. The Flash master sets the value to set channels to when you click a flash button in the submaster. The speed master controls the speed of efects and scenes. It doesn't work with the beat control. The Volume master controls the system volume ("Wave"). Below each slider is a reset button that sets the master to 100%(dimmer, flash, volume) or to 0 (speed). |
=== Deutsch === | === Deutsch === | ||
Im Master-Fenster befinden sich vier Regler. Der Dimmermaster regelt alle Dimmer- und RGB-Kanäle. Der Flashmaster legt den Wert fest, auf den bei einem Flash z.B. aus dem Submaster geschaltet wird. Der Speedmaster manipuliert die Geschwindigkeit aller laufenden Szenen und Effekte, ausgenommen solche, die vom Beat-Signal gesteuert werden. Der Volumemaster regelt die Systemlautstärke ("Wave"-Regler in der Windows-Lautstärkeregelung). Alle Regler können mit den Reset-Buttons auf ihren Standardwert zurückgeschaltet werden. Die Standardwerte der Master Dimmer, Flash und Volume sind 100% und der des Masters Speed 0. | Im Master-Fenster befinden sich vier Regler. Der Dimmermaster regelt alle Dimmer- und RGB-Kanäle. Der Flashmaster legt den Wert fest, auf den bei einem Flash z.B. aus dem Submaster geschaltet wird. Der Speedmaster manipuliert die Geschwindigkeit aller laufenden Szenen und Effekte, ausgenommen solche, die vom Beat-Signal gesteuert werden. Der Volumemaster regelt die Systemlautstärke ("Wave"-Regler in der Windows-Lautstärkeregelung). Alle Regler können mit den Reset-Buttons auf ihren Standardwert zurückgeschaltet werden. Die Standardwerte der Master Dimmer, Flash und Volume sind 100% und der des Masters Speed 0. | ||
Version vom 8. April 2010, 18:37 Uhr
Willkommen zum PC_DIMMER, dem OpenSource-Lichttechnikprogramm für Ihren Computer. Dieses Handbuch soll Sie bei der Verwendung des Programms unterstützen und für die ersten Schritte im Programm behilflich sein.
Bitte fühlen Sie sich frei, selbst eigene Erweiterungen an diesem Handbuch vorzunehmen. Melden Sie sich dazu am PC_DIMMER-Wiki mit einem Benutzernamen an und bearbeiten Sie diese Seite.
Inhaltsverzeichnis
- 1 Overview/Übersicht
- 2 DMX512-Output / Ausgabe
- 3 Hauptfunktionen
- 4 Nebenfunktionen
- 5 Tools für Fortgeschrittene
- 6 Einstellungen und Steuerungen
- 7 Tipps und Tricks
Overview/Übersicht
English
PC_DIMMER is a great tool for controlling all your automated multimedia events. Its primary use is to (DMX-) control lamps and intelligent lights.
Quick overview
- Control of lamps of all types
- Grouping and fanning of devices
- Webcontrol and networkfunctions
- Control cues by time
- control of media-cues
Types of controlling
- Midi-Input/Output
- DMX-In
- Joysticks or Gamepads
- IR-control
- Networks
- Own hardware (plugins)
DMX512-Output / Ausgabe
English
To set up the DMX-output of PC_DIMMER, go to settings, Advanced settings.
In the outputplugins, you can select one or more interfaces to control DMX-output. Here's a list of supported interfaces:
- Art-Net transceiver
- Cypress PSoC USB2DMX Interface
- DasLight DVC
- DiscoLiteZ
- DMX4All
- DMXChaser128
- DMXControl Bridge
- Digital Enlightenment DMX
- Dworking DMX 1
- Dworkin DMX Pro 2
- Elektor MoMolight-Protokoll
- Elektor Oksidizer DMX
- JMS USB2DMX
- KWL Lighting DMX512 USB
- MiniDMX
- MiniLumax DMX512
- Monacor DMX510USB
- Monacor DMX60/DMX120
- OksiD DMX3/1
- Enttec Open USB to DMX
- Parallelport Output
- 128 Kanal PC_DIMMER Seriell
- 32 Kanal PC_DIMMER Seriell
- PC_DIMMER DMX512 (uDMX)
- 128 Kanal PC_DIMMER Igor-USB
- 32 Kanal PC_DIMMER Igor-USB
- PC_DIMER Netzwerk
- PDA/XDA PPC_DIMMER
- R. E. Teune Dimmer
- Velleman K8055 (Conrad USB)
- Velleman K8062 USBDMX
The only interface that can nbe configured from out PC_DIMMER is the Digital Enlightenment DMX.
Since this interface can be connected more than one time to the same PC (to create more than one universe), the right interface has to be chsoen depending on its serial number. The 'Betriebsart' configures how you want the interface to behave. In the advanced DMX-In settings you can configure the interface to create DataIn Events or to directly control the PC_DIMMERs output channels.
The timing-settings let you precisely set the needed timings on the DMX-bus. More information on this can be found on the digital-enlightenment.de website.
Hauptfunktionen
Kanalübersicht
Faderpanel
Gerätesteuerung
Gruppeneditor
Grafische Bühnenansicht
Kontrollpanel
Submaster
Szenenverwaltung / Scenelibrary
English
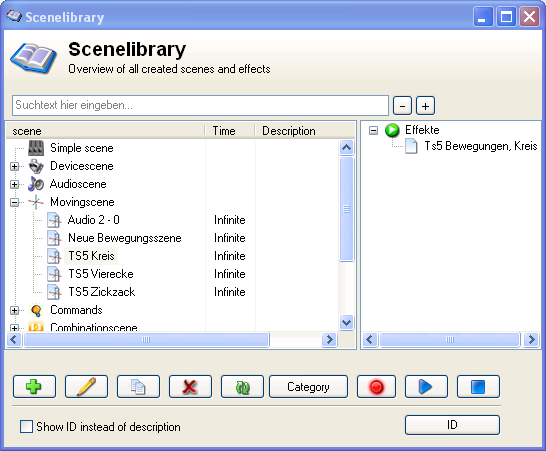
All scenes used in PC_DIMMER are saved in the scenelibrary. Here you can add, edit, copy and remove scenes of the different types. The window also will be showed, if you have to select a scene, for example for the cuelist.
Find scenes
Above the scenelist is a text box to enter a search text. All scenes with the search text in the name or description will be showed. With the two buttons + and - next to the box you can open and close all nodes in the list. If you select one scene, you can see in the box right of the list where the scene is used. To refresh the list, click the refresh-button on the bottom.
Add scenes
To add scenes, you have two ways: Click the green +-Button on the bottom to add a scene of a type you can choose. Then you will see the settings-window of the scene. The second way is the red record button on the bottom right. You can add a devicescene with actual values. You just change values of the devices, for example with the stageview or the submasters, and then PC_DIMMER will save the changed values or the values of the selected group. You also find the record-button in other parts of PC_DIMMER.
Edit, copy, remove scenes, categories
with the buttons on the bottom of the window you can execute these actions. You also find a category-button. With this button, you can sort scenes into categories. Just enter the name of the category.
IDs and testing
The two buttons on the bottom right are used to start and stop the selected scene.
Every Scene in PC_DIMMER has an unique number. This number is used to start and stop the scenes. You can show it by clicking the ID-button. Normally you don't need this button. Only some plugins need it.
Nebenfunktionen
Master
English
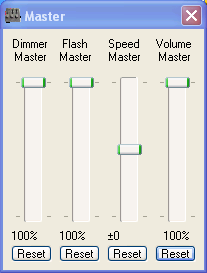
The master window includes four sliders. The Dimmer master controls all dimmer and RGB channels. The Flash master sets the value to set channels to when you click a flash button in the submaster. The speed master controls the speed of efects and scenes. It doesn't work with the beat control. The Volume master controls the system volume ("Wave"). Below each slider is a reset button that sets the master to 100%(dimmer, flash, volume) or to 0 (speed).
Deutsch
Im Master-Fenster befinden sich vier Regler. Der Dimmermaster regelt alle Dimmer- und RGB-Kanäle. Der Flashmaster legt den Wert fest, auf den bei einem Flash z.B. aus dem Submaster geschaltet wird. Der Speedmaster manipuliert die Geschwindigkeit aller laufenden Szenen und Effekte, ausgenommen solche, die vom Beat-Signal gesteuert werden. Der Volumemaster regelt die Systemlautstärke ("Wave"-Regler in der Windows-Lautstärkeregelung). Alle Regler können mit den Reset-Buttons auf ihren Standardwert zurückgeschaltet werden. Die Standardwerte der Master Dimmer, Flash und Volume sind 100% und der des Masters Speed 0.
Audioeffektplayer
Cuelist
Textbuch
Effektsequenzer
Timecodeplayer
Beattool
English
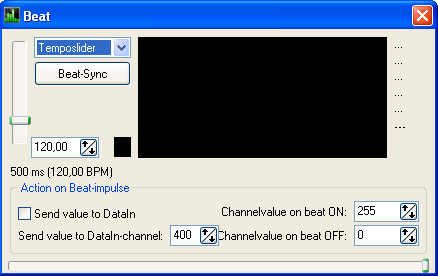
With the Beattool you can control PC_DIMMER from an external 'audio' signal.
With the FFT-option you have 32 frequency channels that can control up to 32 virtual channels. First of all activate FFT from the function-drop down menu. Next, select the audio-card you will be using the input the audio signal into the Beattool. Next, select the input-channel from the audio-card (Line in, microphone, ....) There is no volume-control here, so the volume should be set by the windows-tool provided with your audio-card.
In the lowest block, you can then set the behaviour of the FFT-Beattool. First click on the frequency bar you want to use to control a certain function of your lightfixture. Next, select which DataIn-channel must react on this Frequency-bar. Also select a multiplicator value. If these 3 parameters are selected, click on the 'Send values of this channel to DataIn' to activate it.
Example: Suppose you have an RGB-light fixture. You want frequency bar nr3 to control the RED-intensity, frequency bar nr 15 to control BLUE-intensity and finally frequency bar 23 to control GREEN-intensity. Click on bar 3, select DataInchannel 1 and multiplicator 255 (values between 200-300 normally to work best) and activate it with 'Send values of this channel to DataIn' Repeat this for Bar 15, which you direct to DataIn channel 2 and bar 23 you redirect to DataIn channel 3.
Don't forget to go to the configuration of the DataIn Events. There, you have to softpatch the right channels. For the above example, make sure DataIn channel 1 is softpatched to the correct DMX-channel of the light-fixture (E.g. 38 is the RED-DMX channel of the fixture), Also DataIn channel 2 and 3 must be correctly softpatched (e.g. 39 and 40)
CD-Player
Zeitsteuerung / Scheduler
English
Timecontrolled events can run PC_DIMMER scenes, effects and scripts to definite times. Events can run once, daily, weekly or monthly. All settings can be done in the Scheduler window. Here you see a list of your planned events and the local time. You also can disable the scheduler with the checkbox stop timer and you can test your events with the buttons to start and stop the event. In the main PC_DIMMER window you see the state of the scheduler in the bar at the bottom.
Deutsch
Im Fenster Zeitsteuerung kann ein Timer programmiert werden. Dieser kann zu bestimmten Zeiten Szenen, Effekte und Skripte ausführen. Diese Events können einmalig, täglich, wöchentlich oder monatlich ausgeführt werden. Der Status der Zeitsteuerung kann jederzeit im PC_DIMMER-Hauptfenster in der Statusleiste eingesehen werden. Im Konfigurationsfenster kann der Timer auch deaktiviert werden und die programmierten Events können zum Testen gestartet und gestoppt werden.
Tools für Fortgeschrittene
Geräteeditor
Hints and tricks A color-channel can never have 2 times the very same color. The selection-box must be able to make a distinction between different colors. In the event that there would exist 2 times the same color, give a small adjustment on either r,g or b channel of 1.
Einstellungen und Steuerungen
Erweiterte Einstellungen
Tastatursteuerung
Joysticksteuerung
Data-In Processing / Steuerung
English
With the DataIn settings, you can have DMX-In events and add specific functions to control specific PC_DIMMER-channels.
Edit Data-In Events
Here you specify how a certain DataIn event must react. First of all, you can verify here to see if your interface DMX-understands correctly the DMX values it receives from an external DMX-controller. Therefore, move one of the external DMX sliders. Below in the PC_DIMMER you should now see the channel and the value that is read. If not, verify that your interface is correctly set up, that all DMX cables have been connected and that you've configured PC_DIMMER to accept DMX-input. To do this, go to settings. Click on Data-In and activate 'process DataIn'.
To enter a new DataIn-event, click on the plus-sign below and start entering the DMX channel it must react on and eventually a specific value that must be given. In the 'Edit command' field, you can than specify what must be done when the DMX-values are generated externally. Different possiblities can be chosen in the Part of Program selection. Depending on the setting here, you must select the according parameters. Example: you can have an external DMX-table that can control the PC_DIMMERs submasters. As Part of Program, you select 'Submaster', the control is 'auf eingangswert schalten' and the options is the submaster fader number which will be moved.
Other possiblities here are:
- Control of the Audioeffectplayer
- Control of scenes
- Control of the Beattool
- Control of a Master/MIDI or program
- Control of a single channel
- Control of devices or devicegroups
- Control of device- or group setups
- Control of the Cuelist
- Control of your created effects
- Control of the Kontrollpanel
- Control of the joystickmovement
- Control of the Plugins
Softpatch of PC_DIMMER-channels to DataIn-channels
For very special applications (mostly part of plugins), you can have PC_DIMMER to softpatch its channels to DataIn-Channels. When doing so, you can then afterwards use the above mentioned functionalities for DMX-inputs with PC_DIMMERs own channels. One PC_DIMMER channel can be softpatched to one or more DataIn Channels. Therefore, select the PC_DIMMER channel on the left side and afterwards select one or more DataIn channels on the richt side. Repeat this stetp for all the PC_DIMMER channels you want to softpatch.
Softpatch of DataIn-channels to PC_DIMMER-channels
Each DataIn-channel can be softpatched to one or more PC_DIMMER-channels (DMX-channels) Example: Select DataIn Channel 1 in the left softpatch-pane and then select in the right pane the according PC_DIMMER (or DMX) channel(s) e.g. 38 You can repeat these steps for all needed DataIN-channels you will need. With this setup, you can very quickly couple external DMX-channels to control internal PC_DIMMER channel(s) This principle is also used when using plugins that generate DataIn events. Also the Beattool uses this principle, since the FFT-mode of the Beattool produces values in configured DataIn channels. In this windows, you can then afterwards define which DataIn channels will really control which DMX-channels of PC_DIMMER will be changed.


